
As some of you may know by day I work in an Italian coffee shop, and because it's fairy new we've still not been able to set up all the recycling facilities that I would like to see. As a result all the staff have been making an effort to reuse and recycle anything useful that normally would be thrown away. One lady has been taking home honey-jars to put her preserves in, another has been taking home and painting our unwanted jam jars. I've been concentrating on collecting all the interesting paper that is used as packing material. Our deliveries come straight from Italy, and for some reason the Italian suppliers use interesting, and sometimes beautiful, papers to wrap delicate items. Gathering them up I noticed that the papers included pictures of smiling housewives, ice-cream cones, footprints, meat products, cows and pastoral scenes. It seemed like a tragedy to throw that paper away, so I've been re-purposing it and binding it into notebooks using cardboard packaging to create hard covers. The technique is really simple, all you need are basic sewing skills, and after a bit of practice you can create something beautiful, unusual and useful in under an hour.
Inspiration for this project comes from Esther K. Smith and her fantastic book How to Make Books. If you like the idea of sewing or folding your own books then I highly recommend her book.
You will need:
Plain or printed packing paper
A thin cardboard box with a nice printed design on the front. Anything that catches your eye.
Pencil, ruler and scissors
A thumb-tack or noticeboard pin
A large needle
Brightly coloured thread
Bulldog clips (also known as butterfly clips)
Begin by choosing a cover for you notebook. Any thin cardboard box will make a great cover. Consider the size of notebook you are hoping for and carefully cut separate front and back covers for your notebook making sure that they are of equal size.
To make the pages of your notebook measure your cover. Each page should measure the same height as the cover, but double the width. From my experience twelve pages cut in this way makes a nice size of notebook. Fold each page in half widthways and stack them together so that the folded edges face left. Already you can begin to see the notebook taking shape!


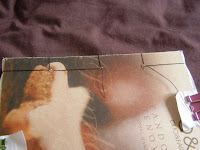
Before you can start binding the pages together it's a good idea to prep the covers by scoring them where the notebook needs to be hinged. Measure 1 ½ cm (or 1inch) from the left-hand edge, mark this with pencil and score gently with a pair of scissors. Gently bend each cover along this scored line to make sure your notebook can be easily opened.
Now you can start putting the notebook together! Put the front cover on top of your stack of pages and the back cover behind. Check that all the pages are facing the right way and then line the whole thing up as neatly as you can by tapping the spine on a flat surface. Secure the stack in place with bulldog clips on the top, bottom and on the right-hand edge. Leave the left-hand side free so you have room to sew. If you think the bulldog clips might dent the covers then use pieces of scrap paper to cushion the clips.

To begin piercing the spine find the mid-point along the fold you created in the front cover. You can measure this or judge by eye. Press a thumb-tack into the fold. Make sure you do this on a soft surface! Flip the book over and press the thumb-tack into the back of the hole you just created, just to make sure the hole is clear and will be easy to sew through. Now measure the mid-point between the central hole and the top of the book. Pierce another hole in the fold the same way as the first. Finally repeat the process by finding the mid-point between the central hole and the bottom of the book. You should now have three equally spaced holes along the spine, like this:
Now you can bind everything together. Thread a large needle with 1 ½ metres or so of brightly coloured thread and thread the needle through the central hole, front to back. Leave a tail of thread on the front of the book, this can be tied off later. Once through, bring the needle to the front of the book again and thread it again front to back, creating a loop which wraps around the spine.

Turn the book over and thread the needle through the lower hole, back to front. You will see you have begun to create a mixture of horizontal and vertical threads, the horizontal wrapping around the spine and the vertical following the line of the fold. Re-pierce the lower hole, back to front once again, and you will have created a horizontal thread for this hole too.

In order the finish the bottom of the notebook you need to complete the vertical thread, to do this simply bring the needle down to the bottom of the book and re-pierce the lower hole one final time, back to front. The thread should follow the fold around the bottom of the book, like this:

The thread should now be at the front of the book, so put the book face-up again and thread the central hole again, front to back. Take the needle up to the upper hole and, as with the lower, pierce it back to front twice to bind it horizontally. To complete the upper half of the book bring the needle upper over the top of the book so that the thread follows the line of the fold. Pierce the upper hole a final time, back to front. All there is left to do is to tie the working thread to the tail left at the central hole. The thread should look as pictured without any doubling-up or any gaps. Release the bulldog clips and your notebook is complete!

Once you get more confident you can try to incorporate buttons and beads into you design, or can can experiment with more unusual binding patterns.
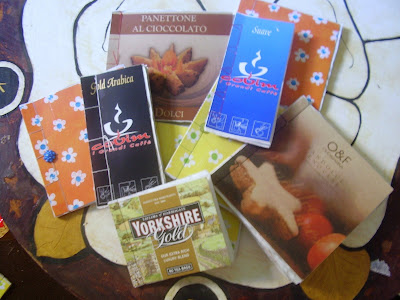
I've become a bit obsessed with notebook-making over the past month or so and have made far more than I can ever use, so if you like the look of any of the notebooks pictured or don't have access to interesting Italian packing papers then take a look at my etsy shop where I have many for sale.
Thanks very much for reading and even greater thanks to my boyfriend for putting up with the bales of paper that have taken over our house recently!
Stay lucky everyone
x x x


